
Authenticate your users in less than 10 minutes with Angular 7 and Firebase

User Authentication system with Angular 7 and Firebase Auth. In this article we will cover in the more simple way how to authenticate your user with FirebaseAuthModule and Angular 7. To keep it short we will consider you already have you Firebase account setup and ready to go. If it's not the case, please read my article on how to setup Angular 7 and Firebase before you start.
Setting Up Our Firebase Authentication
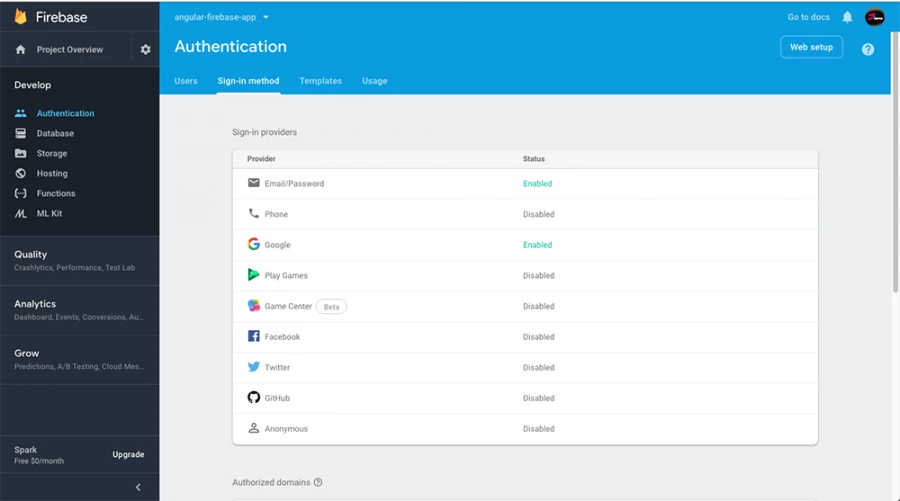
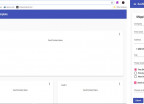
We will use the two most basic and simple authentication Provider known as: Email/Password and the Google Social Login. So, go into your Firebase Console and click on the Authentication link on the letf menu and enable the Email/Password and Google Setting as shown below. the other works the similar way, except that you have to do some extrat configuration for them to work. For example Facebook on your Developer Dashboard.
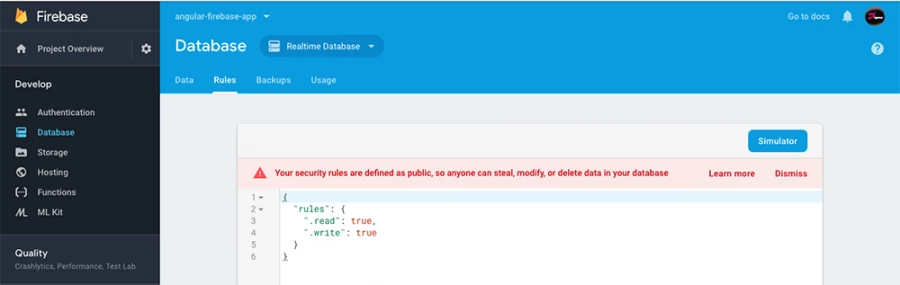
Then, next to your databse Rules and set the rules to public for this test like the picture below.
Generating Our Components
For this authentication, we will need three components to handle the different pages of our interfaces as listed below:
-
LoginComponent (handle the login process)
-
SignupComponent (for the signup process )
-
homeComponent (a protected page reserved for authenticated users)
So, go to the terminal and run the following commands:
ng g c login
ng g c signup
ng g c home
Adding Our Routing
After adding these new components, let’s now add the corresponding routing. Go into your routing file and add the following :
  { path: 'login',  component: LoginComponent},
  { path: 'signup',  component: SignupComponent},
  { path: 'home',  component: HomeComponent}
Building Our Interfaces
To keep this part flexible, I seperate it from this article to give your the posibility to use any other UI framework of your choice like: Bootstrap, Foundation or even HTML and CSS. I use Angular Material Design to get it done. Here is the link: Create Responsive User Interfaces For Authentication With Angular Material Design to have something similar to this.

Creating Our Auth Module
To keep our code clean, we will put all our authentication code in a single module. So, go ahead and run the following command:
ng generate module coreWhen done, we import our newly created module in the src/app/app.module.ts as shown below:
//import the core module

import { CoreModule } from './core/core.module';

...

imports: [

...

  CoreModule,

...

],
Creating Our Auth Service
After this, the next thing will be to add a service to handle all the shared methods and properties that are communicating with our firebase system. Run the following command and update its content with the below code snippet. src/app/core/auth.service.ts
ng generate service core/authimport { Injectable } from '@angular/core';
import { Router } from '@angular/router';
import { auth } from 'firebase';
import { AngularFireAuth } from '@angular/fire/auth';
import { AngularFirestore } from '@angular/fire/firestore';
import { Observable, of } from 'rxjs';
import { switchMap } from 'rxjs/operators';
import { User } from './user';
@Injectable({
providedIn: 'root'
})
export class AuthService {
user: Observable<User>;
constructor(
private afAuth: AngularFireAuth,
private afs: AngularFirestore,
private router: Router,
) {
//// Get auth data, then get firestore user document || null
this.user = this.afAuth.authState.pipe(
switchMap(user => {
if (user) {
return this.afs.doc<User>(`users/${user.uid}`).valueChanges()
} else {
return of(null)
}
})
)
}
//login user with google
googleLogin() {
const provider = new auth.GoogleAuthProvider();
return this.oAuthLogin(provider);
}
//social login with popup
private oAuthLogin(provider) {
return this.afAuth.auth.signInWithPopup(provider)
.then((credential) => {
this.updateUserData(credential.user)
})
.catch(error => this.handleError(error));
}
// Sets user data to firestore on login/signup
private updateUserData(user) {
const userRef = this.afs.collection('users').doc(user.uid);
const data: User = {
uid: user.uid,
email: user.email,
displayName: user.displayName,
photoURL: user.photoURL
}
return userRef.set(data, { merge: true });
}
//signup a new user(by email/password ) to our firebase
emailSignUp(email: string, password: string) {
return this.afAuth.auth
.createUserWithEmailAndPassword(email, password)
.then(credential => {
console.log('Signup successfully!');
this.router.navigate(['/login']);
return this.updateUserData(credential.user);
})
.catch(error => this.handleError(error));
}
// login an existing user with email/password
emailLogin(email: string, password: string) {
return this.afAuth.auth
.signInWithEmailAndPassword(email, password)
.then(credential => {
console.log('Login successfully!');
this.router.navigate(['/home']);
return this.updateUserData(credential.user);
})
.catch(error => this.handleError(error));
}
// Sends email allowing user to reset password
resetPassword(email: string) {
const fbAuth = auth();
return fbAuth
.sendPasswordResetEmail(email)
.then(() => console.error('Password update email sent'))
.catch(error => this.handleError(error));
}
//logout a user
signOut() {
this.afAuth.auth.signOut().then(() => {
this.router.navigate(['/login']);
});
}
// If error, console log and notify user
private handleError(error: Error) {
console.error(error);
alert(error.message);
}
}
Explanation of the code:
Yeah, we added a bunch of code let’s explain what is going on. First of all, we are importing the Firebase Service like the auth that will help us instantiate an instance of the GoogleAuthProvider() and the two AngularFire classes. One for the Authentication and the other for the Store.
We are also importing some Rxjs Operators and Observables to ease the process of our data interchange between our Application and Firebase.
Our first block of code inside the constructor is checking the user status and update the Observable user variable with the data after each change from Firebase on null if the user is not authenticated.
From there all the rest of our 8 methods are self-explanatory. Starting with the GoogleLogin() we pass the sign-in provider to the oAuthLogin() that calls the signInWithGoogle() method of the AngularFireAuth Class with that very provider and return a user on resolve or through the error if one occurs. You see that after we get the resolved user we update it on our Firestore with the UpdateUserData() method. Similarly, this is how all other methods are working.
Creating Our Auth Guard
A guard here is like a kind of middleware that will sit between our Component and routing to filter authenticated user before there can access some pages like the /home page for example. This is what its code looks like:
ng generate guard core/auth
If it asks you to choose the interface to implement, press the spacebar and hit Enter to choose the canActivate Interface then update you code like the following: src/app/core/auth.guard.ts
import { Injectable } from '@angular/core';
import { CanActivate, ActivatedRouteSnapshot, RouterStateSnapshot, Router } from '@angular/router';
import { AuthService} from './auth.service'
import { Observable } from 'rxjs';
import { tap, map, take } from 'rxjs/operators';

@Injectable({
  providedIn: 'root'
})
export class AuthGuard implements CanActivate {
  constructor(private auth: AuthService, private router: Router) {}


  canActivate(
    next: ActivatedRouteSnapshot,
    state: RouterStateSnapshot): Observable<boolean> {

    return this.auth.user.pipe(
      take(1),
      map(user => !!user),
        tap(loggedIn => {
          if (!loggedIn) {
            console.log('access denied')
            this.router.navigate(['/']);
          }
        })
    )
   }
}
Then don’t forget to update your /home route to support the canActivate Guard as shown below:
Don’t forget to import the AuthGaurd before you use it.
{ path: 'home', component: HomeComponent, canActivate: [AuthGuard]}
Updating Our CoreModule
Add the following lines of code in your src/core/core.module.ts to let him be aware of our AngularFireAuthModule, AngularFirestoreModule, AuthService and AuthGuard.
import { NgModule } from '@angular/core';
import { CommonModule } from '@angular/common';

import { AngularFireAuthModule } from '@angular/fire/auth';
import { AngularFirestoreModule } from '@angular/fire/firestore';

import { AuthService } from './auth.service';
import { AuthGuard } from './auth.guard';

@NgModule({
  imports: [
    CommonModule,
    AngularFireAuthModule,
    AngularFirestoreModule
  ],
  providers:[AuthService, AuthGuard],
  declarations: []
})
export class CoreModule { }
After this, launch your server to make sure everything is working well. If no error you are good. You can try to access your /home page and check you console you will see that it will say that access denied and redirect you back to the / page.
Implementing Our Login Component
Go to your src/app/login/login.component.ts and update it as follow:
import { Component, OnInit } from '@angular/core';

import { Router } from '@angular/router';
import { AuthService } from '../core/auth.service';

@Component({
  selector: 'app-login',
  templateUrl: './login.component.html',
  styleUrls: ['./login.component.css']
})
export class LoginComponent implements OnInit {

  title: string = "Login"
  constructor(private myService: AuthService, private router: Router) {}

  ngOnInit() {

  }

  loginWithGoogle(){
    this.myService.googleLogin().then(
      () => this.router.navigate(['/home'])
    )
  }

  loginWithEmail(formData){
    this.myService.emailLogin(formData.value.email, formData.value.password);
  }

}
Here we are just calling the googleLogin() and the loginWithEmail() methods of our AuthService and if success we redirect the user to the home page. To bind those methods in our html code, let’s update the code of our src/app/login/login.component.html as follows:
<div class="form-wraper">
  <div class="form-container card">
    <div class="form-header">
      <img src="./../../assets/car-key.svg"  class="main-lock-icon" alt="">
    </div>
    <form #formData='ngForm' (ngSubmit)="loginWithEmail(formData)">
      <div class="form-body">
        <mat-form-field class="justifier">
            <input matInput placeholder="Email" type="email" class="form-input" (ngModel)="email" name="email" required>
        </mat-form-field>
        <mat-form-field class="justifier">
            <input matInput placeholder="Password" type="password" class="form-input" (ngModel)="password" name="password" required>
        </mat-form-field>
      </div>

      <div class="form-footer">
          <button type="submit" mat-raised-button class="btn custom-btn">
              <mat-icon>input</mat-icon> Login
          </button>
          <div class="txt">
            OR
          </div>
          <button mat-raised-button class="btn" (click)="loginWithGoogle()">
            <img src="./../../assets/search.svg" alt="" class="google-icon"> Login With Google
          </button>
      </div>
    </form>
    <div class="additional-link">
      <a routerLink="/signup">No Account? <strong>Create one here</strong></a>
    </div>
  </div>
</div>
Updating Our Home Component
Now if you retry, you will see that after login it will redirect to the /home page. Now, let’s update our /home page to look a bit nicer. Add this to your src/app/home/home.component.html
<div *ngIf="auth.user | async; then authenticated else guest">
  <!-- template will replace this div -->
</div>

<ng-template #authenticated>
  <div class="home-container">
    <div class="wraper" *ngIf="auth.user | async as user">
      <div class="profil-img">
        <img class="image" [src]="user.photoURL" alt="user profil">
      </div>
      <div class="profil-name" >
        <h2>Welcome Here</h2>
        <h1>{{user.displayName}}</h1>
      </div>
      <br>
      <a href="javascript:0" (click)="auth.signOut()">Logout</a>
    </div>
  </div>
</ng-template>


<ng-template #guest>
  <div class="home-container">
    <div class="wraper">
      <div class="profil-img">
      </div>
      <div class="profil-name" >
        <h2>Welcome back!</h2>
        <h1>Guest</h1>
      </div>
      <br>
      <a [routerLink]="['/login']">Login</a>
    </div>
  </div>
</ng-template>
Your src/app/home/home.component.ts should look like this:
import { Component, OnInit } from '@angular/core';
import { AuthService } from '../core/auth.service';

@Component({
  selector: 'app-home',
  templateUrl: './home.component.html',
  styleUrls: ['./home.component.css']
})
export class HomeComponent implements OnInit {

  constructor(public auth: AuthService) { }

  ngOnInit() {
  }

}
Please make sure you instantiate the auth variable with the public access modifier. It allows you to access it on your view as show on the html code above. And the css code is here src/app/home/home.component.css
.home-container{
margin: 50px 0;
}
.wraper{
width: 20%;
margin: 5px auto;
text-align: center;
}
.image{
width: 150px;
height: 150px;
border-radius: 50%;
}
@media (min-width: 481px) and (max-width: 767px) {
.wraper{
width: 30%;
margin: 5px auto;
text-align: center;
}
}
@media (min-width: 320px) and (max-width: 480px) {
.wraper{
width: 50%;
margin: 5px auto;
text-align: center;
}
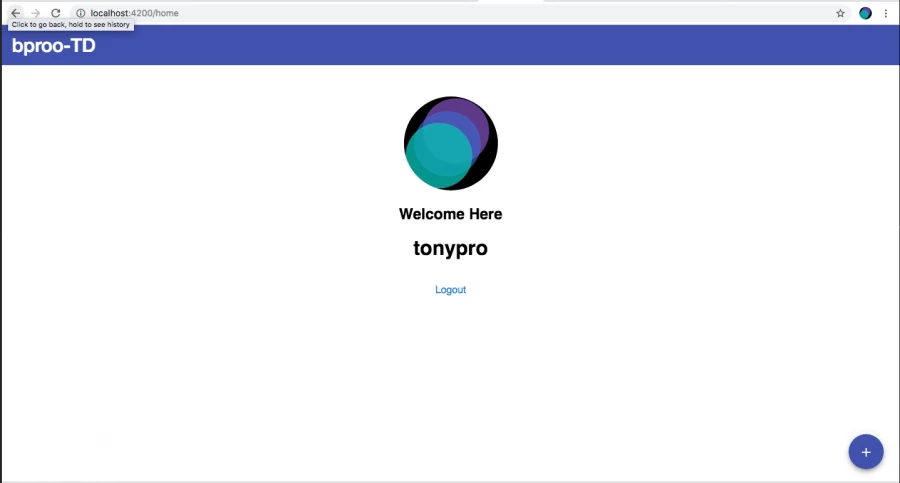
}Yeah, it look similar to this:
Implementing Our Signup Component
Here the user enters his information to store on the cloud. We will need to write the onSignup() method into our src/app/signup/signup.component.ts as shown below.
import { Component, OnInit } from '@angular/core';
import { AuthService } from '../core/auth.service';

@Component({
  selector: 'app-signup',
  templateUrl: './signup.component.html',
  styleUrls: ['./signup.component.css']
})
export class SignupComponent implements OnInit {

  constructor(private myService: AuthService) { }

  ngOnInit() {
  }

  onSignup(formData){
    this.myService.emailSignUp(formData.value.email, formData.value.password);
  }

}
And we update the your src/app/signup/signup.component.html to add the form onSignup() method and the different model in our form inputs. Here is the code:
<div class="form-wraper">
    <div class="form-container card">
      <div class="form-header">
        <h3 class="form-title">Join now</h3>
      </div>
      <form #formData='ngForm' (ngSubmit)="onSignup(formData)">
        <div class="form-body">
          <mat-form-field class="justifier">
              <input matInput placeholder="Email" type="email" (ngModel)="email" name="email" class="form-input" required>
          </mat-form-field>
          <mat-form-field class="justifier">
              <input matInput placeholder="Password" type="password" class="form-input" (ngModel)="password" name="password" required>
          </mat-form-field>
        </div>

        <div class="form-footer">
            <button mat-raised-button class="btn custom-btn">
                <mat-icon>add</mat-icon> Signup
            </button>
        </div>
        <div class="additional-link">
          <a routerLink="/login">Already have an Account? <strong>Login</strong></a>
        </div>
      </form>
    </div>
  </div>
Now you have the keys of the authentication process in a web application. Hope you like it. If you have some remarks, leave them on the comments section and make sure you sign up to get notified on new article posting.

Kamdjou Duplex
the world would not be so beautiful without people willing to share knowledge


- 7 years ago
learn how to setup angular 7 and firebase

Save Your Money Today!

By receiving free stock articles and smart tutorials to advance your career.


Save Your Money Today!
By receiving free stock articles and smart tutorials to advance your career...